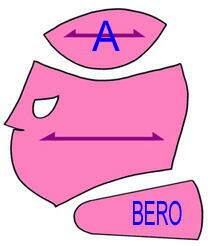
最初に型紙に合わせて生地を裁断しましょう
伸びる素材を使います
(矢印の方向が伸びる向きです。
上の部分は↑↓でもOK!)
BEROは特に伸びる向きは考えなくて良いです
First, cut the fabric according to the pattern. Use stretchable material
(The direction of the arrow is the direction of growth.
It is OK to do the upper part ↑↓! )
With BERO, you don't have to think about the direction in which it will
grow.
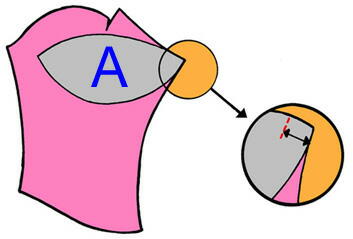
裁断が終ったらそれぞれを縫い合わせてください
最初は皿の部分と顔部分を縫い合わせます
(ピンクが表でグレーは裏です)
この時、皿部分の上下を間違えないように注意!
(緩やかな曲線のほうが上です)
重ねて5ミリ位の所を縫っていきます
Once you have finished cutting, sew each piece together.
First, sew the plate part and face part together.
(Pink is the front and gray is the back)
At this time, be careful not to confuse the top and bottom of the plate!
(The gentler curve is higher)
Overlap and sew about 5mm apart.

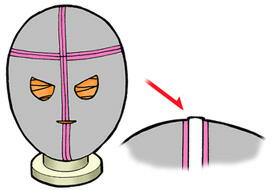
次に左右を縫いましょう
(上と同じように5ミリ位の所を)
後頭部はヒモ通しを付けるので縫わなくて良いです
(鼻の所も)
Next, sew the left and right sides. (Same as above, at about 5mm)
There is a string loop on the back of the head so there is no need to sew it.
(Also the nose area)

マネキン(美容室などにあるもの)の頭に布の切れ端や
ガムテープで人の頭くらいの大きさまで肉付けしたものを用意します
A piece of cloth or a Prepare a piece made with duct tape to the size of
a person's head.

これにマスクを裏返しで被せます
生地が弛まないように洗濯バサミなどで止めます
Put the mask on top of this inside out.
Secure the fabric with clothespins to prevent it from loosening.
余った部分を折り返してボンドで貼ります
(あまりボンドつけないように。慣れたらつけなくても良いです)
折り返したら8ミリ幅位の綿のテープを中央に貼っていきます
Fold the excess part back and paste it with glue.
(Do not apply too much glue. Once you get used to it, you don't need to
apply it.)
After folding it over, stick a piece of cotton tape about 8mm wide in the
center.